Outline
Introduction
Before we begin using Adobe Illustrator, we need to understand a few fundamentals, here is a short introduction to get you started.
Raster & Vector Graphics
The Basics
We will be using Adobe Illustrator to create vector graphics, so let’s familiarize ourselves with the software.
We will start by going over this series of tutorals: Get to know Illustrator (4 videos)
- Illustrator workspace
- Zoom and Pan
- Create a new document
- Save your work
Artboards
Artboards are like pages in your document, they are very useful to separate different elements you are designing without having to create multiple files.
Take a look at this short Artboard tutorial. (3 videos)
Work with artboards
- Understand and navigate artboards
- Create artboards
- Edit artboards
Creating, selecting, and editing shapes
Let’s learn to draw and manipulate shapes in Illustrator with this drawing tools tutorial (5 videos).
Create with drawing tools
- Understand paths and curves
- Draw with the Pencil tool
- Draw with the Curvature tool
- Edit paths and shapes
- Join artwork together to combine paths
Create and edit shapes
Next, we practice using the drawing tools to create and edit shapes. (4 videos)
- Draw simple shapes
- Create lines
- Combine shapes with the Shape Builder tool
- Trace to make shapes
Transform Options: Rotate, reflect, and shear
To streamline the process of drawing shapes and ensuring they are even, we use this set of tools to transform them and arrange them in the artboard, take a look at this video and try to follow along. The sample files are on the website you will be redirected to, make sure to download and open it before starting.
Colour of fill and stroke
To make our designs more interesting and clear, we need to use colour. Take a look at the first video on this tutorial page to learn how to apply colour to your shapes and edit the stroke as well.
Export for Screens
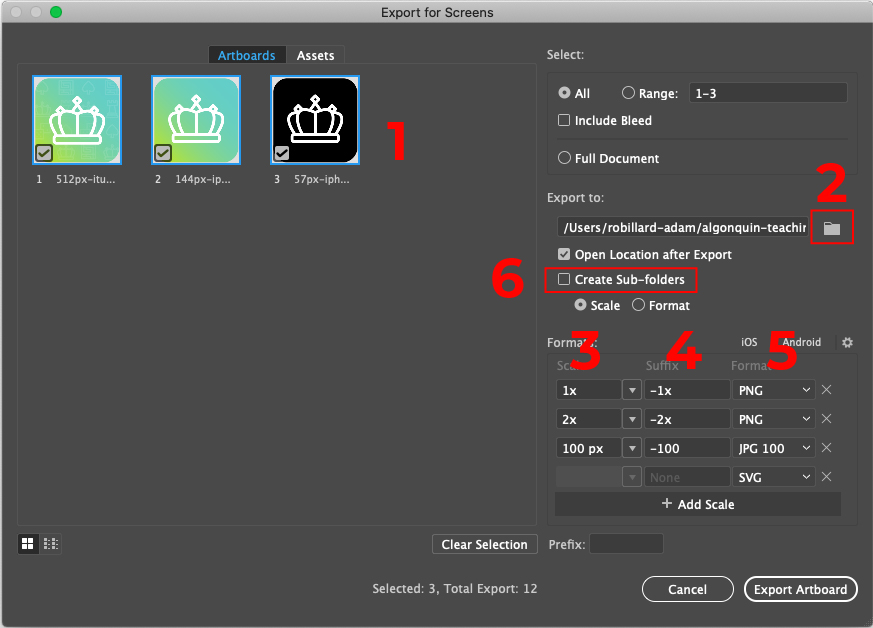
The Export for Screens dialogue allows us to efficiently export our artwork to numerous file types and sizes at once. To access the Export for Screens dialogue, access through the dropdown menus File > Export > Export for Screens or with keyboard shortcut Option + Command + E on Mac or Control + Alt + E on Windows.
The export is based on the artboards in the file, so make sure to set up your file properly with correctly sized arboards for your artwork. In the example below, the icon designs have the exact same width and height as their artboard, allowing them to export cleanly with no extra space around the edges and without accidentally cropping any of the artwork. You can also choose specific artboards to export, while omitting others.

- Artboards preview - here you can select which artboards to export and you can rename the artboards
- Select export location - use this button to find the proper location in your files to export to
- Scale - select the scale of your export. You can select a scale multiplier (1x, 2x, etc.) or a specific width or height.
- Suffix - a short string of text that will be added to the end of the filename to identify the export
- Format - choose the file format for the exported file
- Create Sub-folders - checking this will create a new folder for for each different scale or format that you export. I would recommend unchecking this, as most exports are only a few files at a time and it will just result in numerous unnecessary folders.
